The Science of Pancakes

The science of Flipping Pancakes

Pancakes are a common staple at the breakfast table, whether you’re at home in your PJs or drinking coffee at a diner, and it’s not hard to see why: they’re fluffy, light yet filling, and typically covered in delicious syrup. It’s designed to be comforting cuisine! They might be simple and quick to make, but there’s a lot of chemical science at work that’s easy to miss with your standard sleepy-morning eyes, so we’re going to examine the major steps along the way, from batter consistency to the right color. Let’s dive in to the science of flipping pancakes!

Naturally, the first step when making pancakes is to prepare your batter.

You can create it by either combining dry and wet ingredients like flour and eggs, or by using a pancake mix from your local store, which we’ll be looking at today. Pancake mix will take less time overall than measuring and combining all the other materials since they’re blended already, and contains dehydrated fats like powdered butter, egg powder, and buttermilk. Dehydrating fats, or drying as much moisture out as possible, prevents bacteria, yeast, and mold from growing and ensures the mix stays fresh for long periods. When we add a liquid like water or milk to it, it rehydrates the fats and produces the batter substance we’re looking for.

Before adding the liquid, your bowl contains plenty of dry ingredients and each one has its own role to play. The first ingredient is commonly used in the kitchen: flour. Flour is a powder ground from types of grains. One of these flours, wheat flour, contains two types of proteins that link together and make gluten. 

So what's happening? 

The natural chemical leavening agent we’ll be using is baking soda. This helps pancakes rise up while being fluffy and soft. Baking soda is a base with a high alkaline. When it mixes with an acid or in this case, the buttermilk, it creates bubbles that release a lot of gas.

If you’ve ever combined baking soda and vinegar before then you’ve seen the chemical reaction!

Pancake batter ready for pancakes

Now it’s time to add our liquid to help rehydrate the fats. Box mixes usually call for water, but today we’re going to add milk. Milk will up the fat content of our combination, leading to tender flapjacks with more richness and flavor. Now, you might be wondering what kind of milk to use. 

The liquid helps to activate the baking soda and buttermilk, creating the reaction we just covered. These bubbles will rise as you stir. As this is happening, the CO2 bubbles will be trapped by the gluten in the batter when your pancake solidifies, leading to fluffiness! Avoid mixing the ingredients too much though. This can overwork the gluten formation and leave you with tough pancakes. You’re looking for a mixture that’s still lumpy yet blended.

Now that we’ve added our milk, it’s going to rehydrate it so the fat properties can take effect!

When you mix flour with eggs and liquid, the gluten molecules get more flexible and bind to each other to form networks, or nets. These nets trap the air from the carbon dioxide gas, causing the pancake to lift and have a chewable texture.

You can think of it like a hot air balloon, with the gluten as the balloon and CO2 as the warm air. As the CO2 rises up, it expands out the gluten netting giving it lift.

Pancake Batter Bubbling

Let's get cookin'! 

Now that we have our dry and liquid ingredients together, it’s time to get started! There’s a huge variety of ways to cook these cakes, but for this post we’ll be using a nonstick griddle pan. A nonstick surface is useful so we can flip our cakes without too much adhesion, and a griddle pan evenly distributes heat across the cooking surface so the entire cake is done at the same time. To start, you’ll want to heat the pan on medium heat, but avoid settings higher than this. Too hot would burn our breakfast and too low takes longer to finish! Once the pan is hot enough after a few minutes, take a scoop of batter and pour it in!

Do you see or hear anything when the mix hits the hot pan? You may hear a little bit of a sizzle. This sizzle helps indicate our next step taking place: the Maillard Reaction! This step creates the aroma and golden-brown color on the pancake.

the science of the Maillard Reaction

The Maillard Reaction is a chemical reaction between amino acids in the proteins and the carbon and oxygen atoms from sugars. They all bond together on the molecular level and result in a rich palette of distinct and varied flavors. Basically, the proteins and sugars in the mix transform into new flavors, aromas, and colors from the intense heat of the pan. This reaction is how we get coffee roasts, the crust on a steak, or the color and smell of baked bread!

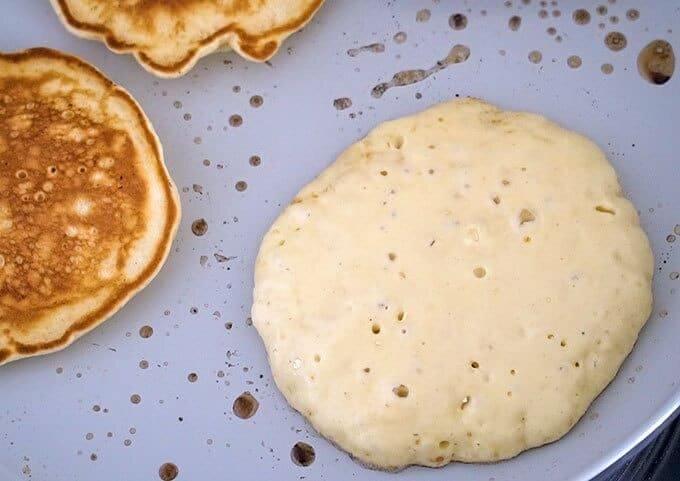
After about a minute, you’ll see the pancake start to firm up and bubbles appear on top. The pancakes turn from liquid to solid through gelatinization. This is when the molecular bonds of starch molecules start to break down when heat and water are introduced. The starch granules absorb the water, swell up, and burst, which causes the batter to thicken and form. The bubbles on top let you know when it’s time to flip the pancake to the other side. This is the gas being forced out of the pancake batter. Cooking raises the temperature and increases the pressure of dissolved carbon dioxide. Bubbles form and rise as the volume of CO2 increases and the capacity of the batter firms up. Once the bubbles pop and release gas, you’re good to flip!

Browning Pancakes

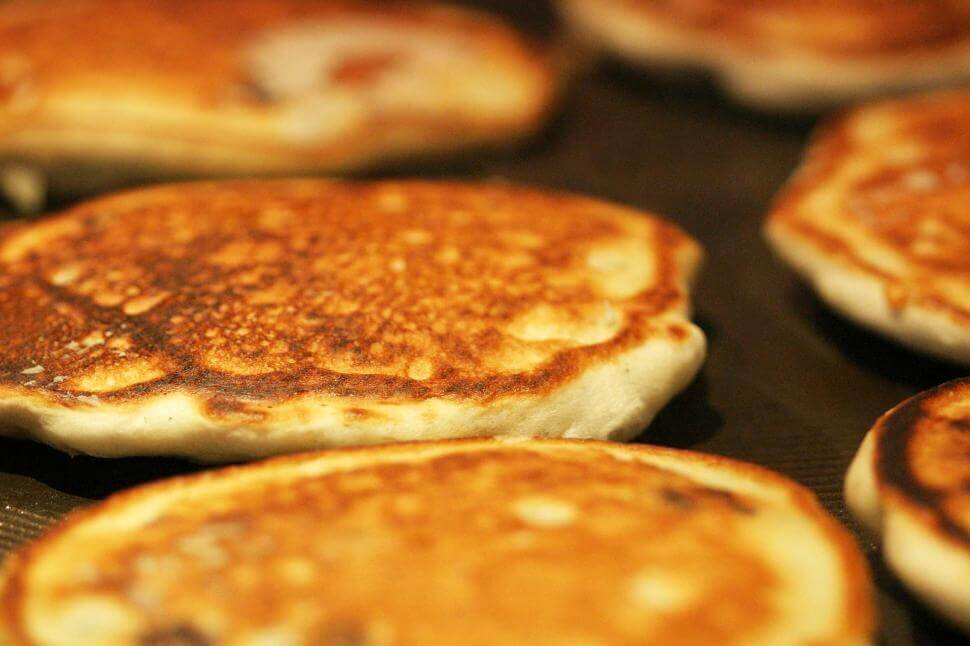
You’ll let it cook for about a minute on the other side. It’ll take less time since there’s already heat in the pancake. Once you get the golden-brown crust you want, take it off the heat and onto your plate! Since you’ll have plenty of remaining batter, you might as well make more. Even as you get low on batter, you can still eat delicious tiny flapjacks! When it’s all ready, serve it up and add your favorite topping. Maple syrup, whipped cream, loose berries, chocolate chips…whatever your heart desires! As we can see, there’s a lot of science that can go into serving up the simple flapjack.

Hydro-Dipped Painted Pot Activity for Kids

Dip into gardening with a hydro-dipped painted pot activity

Lend a hand to our pollinating pals with a hands-on hydro-dipped painted pot activity that kids of all ages will enjoy! 

Hydro-dipping is the process of decorating an item by dipping it into water with a film of paint floating on top. The paint sticks to the object perfectly and completely, no matter its shape! 


Materials:

  • White terracotta pot (A regular terracotta pot will work too, the colors will just look slightly different!)  
  • 5-gallon bucket, or another large container 
  • 1 large button  
  • 1 pipe cleaner  
  • 1 dowel rod   
  • Paper towels 
  • Hydrophobic Marbling Paint (We use the brand Marabu) 
Materials needed for hydro-dipped activity

Step 1:

Create a Hydro-Dipping Mechanism! Thread both ends of your pipe cleaner into the button, then pull your button down towards the middle. Next, twist your pipe cleaner ends together. This will be used as a hydro-dipping mechanism for your pot. Poke the twisted ends of the pipe cleaner through the drainage hole at the bottom of the pot. The result should leave you with pipe cleaner to hold while dipping so your hands stay clean. 

Creating a dipping mechanism

Step 2:

Prepare your Dipping Station! Fill your bucket or container with enough water for your pot to be fully submerged when dipping. At this time, it’s a good idea to set up your paint, dowel rod, and some paper towels near your bucket.  

pre hydro-dipped pot

Step 3:

Pick your Palette! Choose at least two colors of paint and shake about 5-6 drops of each into the bucket.  

pick your pots colors

Step 4:

Give it a Swirl! Working quickly, use your dowel rod and gently make a few swirls in the paint. This will help achieve a marbled look when dipping the pot. Be careful! The paint will want to stick to the dowel rod!  

swirl your paint

Step 5:

Dip your Pot! Slowly dip your pot into the paint. You can use your dowel rod to help push your pot down into the water by gently pressing down on the bottom of the pot with the dowel rod

hydro-dip your pot

Step 6:

Clean the Water! Before pulling your pot back out of the water, use the dowel rod to move any excess paint still floating on the top of the water away from your pot. This is to avoid your pot getting a double coating of paint and looking clumpy. Once the water around your pot is clean and clear, pull your pot out!  

clean the water

Step 7:

You are an Artist! Admire your beautiful work! The paint should be dry almost instantly, you will just need to wait for the water to dry before planting any seeds! Place your pot on your paper towels, and you’re all finished! 

the completed Hydro-Dipped Painted Pot

Expand on the Activity


While you're working, let's learn HOW your hydro-dipped painted pot activity is working! 

Paint is hydrophobic – which means it doesn't mix with water. Just like oil separates from water when combined, so does hydrophobic paint! The paint floats on top because it is less dense! Surface tension also helps to pull the paint towards our pot as it moves, giving us an even coating.  

Try using your pot to create a pollinator garden! Sadly, deadly pesticides have hurt Florida's pollinator count greatly. But we can support our pollinators by providing them with the Florida native wildflowers that they love to eat! Even a small garden makes a big difference. A patchwork of pollinator gardens around the country could provide enough habitats to restore healthy communities of pollinators!  

Homemade Gifts Inspired by Science

Add a genius personal touch by giving homemade gifts inspired by science! 

We all know that one person who is impossible to shop for. Ditch the plastic packaging, and try adding a personal touch to your gift-giving by trying one of these homemade gifts inspired by science! 

Not only will you be creating a one-of-a-kind project, but you'll learn a little and have a lot of fun in the process! 


You don't need to be Michelangelo to create these homemade works of art

Try an ancient art technique 

In this DIY Fresco art activity, we will be doing a modified version that kids of all ages can do at home!


Homemade cards created with chemistry!

Creative cards

Using supplies you can find around the house, customize homemade greeting cards with this marbleized shaving cream technique. Just add calligraphy! 

Nailed it!

Here's a novel idea, add a stunning iridescent effect to any card, or create a custom bookmark. All you need is a few drops of clear nail polish! 

That's a Warp!

It’s a common misconception that wrapping paper can be recycled simply because it’s paper. However, coated, glittery, and textured paper materials cannot.

When these unrecyclable materials get mixed in with recyclable products, it can result in the whole lot being thrown away. Instead, try using paper materials like newspapers, old maps, comics, or make and design your own using recyclable paper bags and DIY stamps!


Reduce, reuse, UPcycle! 

Stitch outside the box

Give your clothes a second life by adding accents or embellishments. Get inspired with some of these embroidery ideas! 

Copy & Paint

Looking for an easy way to customize a t-shirt, tote bag, or even a pair of jeans? With this puffy paint technique, you have a chance to refine your design and keep yourself from suffering the agony of using puffy paint with a shaky hand.

DIY Tie-Dye 

Turn your avocado skins into a fashion statement! Learn how to extract tannin from the pit and skin of avocados to make your own fabric dye!  

Celebrating Native American Heritage Month through STEAM

Join us in celebrating Native American Heritage Month through STEAM

November marks the beginning of Native American Heritage Month, and Orlando Science Center is celebrating through STEAM by highlighting some amazing indigenous people and their incredible contributions to art and preservation!

How did Native American Heritage Month begin?

In the early 1900s, Dr. Arthur C. Parker, a member of the Seneca Nation and director of the Museum of Arts and Science in Rochester, NY, persuaded the Boy Scouts of America to set aside a day for the “First Americans.” The first official “American Indian Day” was celebrated in New York, with others following suit in 1916. In 1990, November was first declared “National American Indian History Month.”

From making moccasins to classic culinary dishes, hear directly from indigenous makers to learn about art that originated in native traditions, and the importance of preserving and celebrating cultures through STEAM! 


Celebrate Native American Heritage Month at Orlando Science Center on your next visit! 

Catch a film! 

 Despite the rise in commercially published books and films by Native American, Indigenous, and First Nations authors and directors, Indigenous people are still underrepresented in literature, movies, and other forms of media. 

Now playing in Dr. Phillips CineDomeInto America’s Wild visits some of the most beautiful landscapes of America! Set out on this journey with trailblazers – astronaut John Herrington, and Alaskan pilot and youth advocate Ariel Tweto, and long-distance hiker Jennifer Pharr Davis – who share a passion for connecting people to experiences in the wild.


Gather around for storytime! 

In order for more space to be made for Native stories in media, it is important to support Native and Indigenous works. Our Early Childhood Education Specialists have shared some of their favorite picture books, check one out for your next storytime, or join us in KidsTown on your next visit! 

  • Sweetest Kulu by Celina Kalluk, illustrated by Alexandria Neonakis
  • We Are Water Protectors by Carole Lindstrom, illustrated by Michaela Goade.
  • When We Were Alone by David Robertson, illustrated by Julie Flett 
  • The Sharing Circle: Stories about First Nations Culture by Theresa Meuse, illustrated by Arthur Stevens
a collage of childrens books


Tweet about it! 

Did you know that Purple Martins famously don't build their own nests? 

Learn out how Native tribes shaped Purple Martin birds, their nesting habits and how we can better practice conservation efforts for migratory birds! 

Planetary Ring Toss • How to Create Your Own Ring Toss Game

Create your own Planetary Ring Toss with simple household objects!

Don't wait for the carnival to arrive, make your own with a DIY carnival ring toss game! This fun, hands-on activity can be made with household materials, and is a great way to practice our motor function skills.

The DIY Planet Ring Toss was recently featured on WESH 2 News' segment, The Science of It. Feel free to follow along with the video or follow the steps below!

This maker-inspired activity requires the use of scissors, so we recommend grown-up supervision for the little learners.


Materials:

  • Paper plates (small and large)
  • Washable markers
  • 1 ruler
  • Stickers, washi tape, or other decorations
  • Painter's tape
  • A pen
  • Scissors

Let's get started! 

  1. Begin by punching a large hole in the center of a paper plate using your pen. The hole should be large enough to insert the blade of your scissors. 
  2. With grown-up supervision, insert your scissors into the hole and cut a large circle out of the center of your plate. 
  3. Using your washable markers, stickers, washi tape, or other decorations, unleash your creativity and decorate your planetary ring! Rings may look like they're made of solid material from Earth, but they're actually made up of rock, ice and dust. Try creating patterns to reflect that - or just let out your inner Picasso. You're the creator here!
  4. Repeat steps 1-3 as many times as you'd like. Planets like Saturn have large rings, but other planets have smaller rings. You can use your smaller paper plates to create small rings for an extra challenge!
  5. Grab your painter's tape and your ruler and find an elevated surface, such as a counter or a table. 
  6. Cut off a piece of tape and use it to secure your ruler to the counter vertically, so that one end sticks straight up into the air. This is your peg!
  7. Now comes the fun part! Do your best to toss your ring onto your peg. For an extra challenge,  you can create a scoring system and make it a competition! Try assigning more points to smaller rings, as they're harder to toss onto the peg. 

More Space-Related Activities

Unique Reptiles at Orlando Science Center

You can meet these magically unique reptiles at Orlando Science Center! 

The fantastic beasts: prehensile-tailed skinks. Where to find them: Orlando Science Center

Say hello to our new and unique reptiles at Orlando Science Center — Gryffin, Sly, Raven, and Puff, four prehensile-tailed skinks who have found a new forever home.  


They don’t have their own broomsticks yet, so they flew to us via airplane all the way from California. They were confiscated by the United States Fish and Wildlife Service in a wildlife trafficking incident. Their bewitching good looks make this species a popular target for the pet trade. Gryffin, Raven, and Sly were collected in the Solomon Islands (located north of Australia) and illegally brought into the United States before being found by wildlife authorities.  

Following their rescue, Raven gave birth to Puff!

These reptiles lay their eggs inside their body and the young hatch within the parent’s body. A group of skinks is called a circulus and all of the adults in the circulus help to raise the baby. Puff seems to prefer spending most of their time with Sly, the other adult female. We are especially excited to watch Puff grow into an adult skink! 

When the skinks were first rescued, they were underweight and fighting off a parasite infection. They have been under the care of our animal experts, and we are happy to report that our veterinarian now deems them to be in excellent health! We are honored to provide a forever home and quality care to these big lizards with a big story!  

two unique reptile skinks cuddling
a skink on a stick with a gryffindor flag in the background
a momma skink on a stick with a ravenclaw flag in the background
a baby skink on a stick with a hufflepuff flag in the background
a skink on a stick with a slytherin flag in the background

STEM Picture Books to Celebrate Hispanic Heritage Month

KidsTown shares their favorite STEM picture books to read to celebrate Hispanic Heritage Month

¡Feliz Mes de la Herencia Hispana! Happy Hispanic Heritage Month! 
 
Did you know, the United States celebrates Hispanic Heritage Month from September 15th to October 15th? This marks a month-long celebration and observance of the histories, cultures, and contributions of Americans who come from -- or whose ancestors come from -- Spain, Mexico, the Caribbean, and Central & South America.
 
To help celebrate Hispanic Heritage Month, our Early Childhood Education Specialists in KidsTown shared some of their favorite STEM picture books featuring Hispanic authors and illustrators. Join us in celebrating stories featuring prominent Hispanic leaders, scientists, and innovators!


Lucía the Luchadora

Written by: Cynthia Leonor Garza
Illustrated by: Alyssa Bermudez

Lucía zips through the playground in her cape just like the boys, but when they tell her "girls can't be superheroes," suddenly she doesn't feel so mighty.

That's when her beloved abuela reveals a dazzling secret: Lucía comes from a family of luchadoras, the bold and valiant women of the Mexican lucha libre tradition. Cloaked in a flashy new disguise, Lucía returns as a recess sensation! But when she's confronted with a case of injustice, Lucía must decide if she can stay true to the ways of the luchadora and fight for what is right, even if it means breaking the sacred rule of never revealing the identity behind her mask. 

picture book: Lucia the Luchadora by

A Song of Frutas

 
Written by: Margarita Engle

Illustrated by: Sara Palacios 

When we visit mi abuelo, I help him sell
frutas, singing the names of each fruit
as we walk, our footsteps like drumbeats,
our hands like maracas, shaking…

The little girl loves visiting her grandfather in Cuba and singing his special songs to sell all kinds of fruit: mangolimónnaranjapiña, and more! Even when they’re apart, grandfather and granddaughter can share rhymes between their countries like un abrazo—a hug—made of words carried on letters that soar across the distance like songbirds.

Hispanic heritage month book: A Song of Frutas Book by Margarita Engle

Dia de Los Muertos

 
Written by: Roseanne Greenfield Thong

Illustrated by: Carles Ballesteros 

El Día de Muertos, Day of the Dead, is here―a holiday for celebrating the lives of departed family and friends. Altars are decorated with sugar skulls and marigolds. Tamales and sweets are ready to eat. Soon it will be time for picnics, music, and a costume parade! Come join in these joyful and vibrant festivities that are a tradition in Mexico, the United States, and throughout Latin America.

A picture book to celebrate  Dia de Los Muertos

La Princesa and the Pea

 
Written by: Susan Middleton Elya 

Illustrated by: Juana Martinez-Neal

El príncipe knows this girl is the one for him, but, as usual, his mother doesn’t agree. The queen has a secret test in mind to see if this girl is really a princesa, but the prince might just have a sneaky plan, too . . .

Readers will be enchanted by this Latino twist on the classic story, and captivated by the vibrant art inspired by the culture of Peru.

Hispanic picture book: La Princesa and the Pea

Off we go to Mexico

 
Written by: Laurie Krebs 

Illustrated by: Christopher Corr

Off We Go to Mexico

Looking for more books to celebrate and learn about Hispanic Heritage Month?

Check out some of the theses different activities to try at home from Scholastic! Try one out and use it as an opportunity to recognize the contributions of Hispanic Americans to U.S. culture!

STEM Surfboard Lesson for Kids • The History and Science of Duke Kahanamoku

Dive into the history of Duke Kahanamoku with a history and STEM surfboard lesson for kids

You've probably heard the term "The Big Kahuna" in reference to an important person, thing, or objective. But where does this term come from? This Asian American & Pacific Islander Heritage Month, we're diving into the history of the original Big Kahuna - Olympic Medalist, and the Father of Surfing - Duke Kahanamoku with this history and STEM surfboard lesson for kids of all ages!


While surf, sun, and swimming have become synonymous with the Hawaiin Islands, this has not always been the case.

At this time, Hawaii was in the midst of many cultural and governmental changes. The expansion of Christianity and foreign missionary influences were having a major impact on Hawaiian heritage and traditions such as surfing. By the end of the 19th century, foreign missionaries had almost erased surfing - or the act of riding waves - from the Hawaiian Islands.

This is where Duke Kahanamoku rides in!

The Big Kahuna was born in Haleʻākala in 1890. He was an excellent surfer, 5-time Olympic Swimming Medalist, actor, and proud representative of his native land. He and a group of fellow surfers even saved the lives of eight after a wave sank their 40-foot boat!

His Kahanamoku Kick swimming technique, superior surfing, and all-around positive passion gave Duke the opportunity to share his skills with the world. He began participating and teaching in surfing exhibitions around the world, going on to become the first person to be inducted into both the Surfing Hall of Fame and the Swimming Hall of Fame.

Sure enough, surfing started to become popular in Hawaii again! Despite the emerging designs including lighter, hollow boards, Duke preferred his own surfboards to be made from koatree using traditional Hawaiian methods, bringing his roots back into the sport. His natural abilities and love of the sport led him to become the legendary surfer known as “The Big Kahuna” and the “Father of Surfing.”

As we reflect on Duke’s life and accomplishments, let’s also look back at his culture and childhood. Duke came from a well-known family that ruled several kingdoms. This gave him a deep appreciation and understanding of Hawaiian culture, which he fought for throughout his entire life. In 1959, when Hawaii became the 50th US State, Kahanamoku was officially named the State of Hawaii Ambassador of Aloha.

There is a statue of Duke in Hawaii near the beach where his ashes were spread. He will forever be loved by the people of Hawaii and looked at as a hero. Because of his talents and passion for surfing, he is known for giving Hawaii a new dimension of international stature, stating that, "he was the soul of dignity."

He is still well loved in his native home of Hawaii, but he is also beloved by surfers everywhere. Not only was he a hero, a great person, and a pioneer-- he was just an all-around good person who fought for Hawaiian culture and surfing.

This summer when you’re hitting the waves with your surfboard, think about the origin, and thank Duke for making surfing what it is today. Surfs up!

a statue of duke kahanamoku in hawaii

Expand with an activity! 


Whether you're hitting the beach, the pool, or creating a tropical getaway in your own backyard, add a little science to your summer with you this surfing STEM lesson for kids! 

Surfboards can come in all shapes and sizes and are made out of different kinds of materials depending on the surf. Using materials you can find around the house and a little creative flair, learn about the science of surfboards with this easy DIY activity! 

a photo of small colorful foam surfboards

Community Scientist Movements You Can Contribute to

Add to Scientific Research Projects as a Community Scientist!

There are thousands of brilliant scientists with PhDs and decades of experience who are on the cutting edge of science and technology. But that doesn’t mean we can’t all do our part in pushing the field of science further! Zooniverse is an online collection of scientific projects that everyday science enthusiasts – also known as community scientists – can take part in.

There are numerous different ongoing experiments that require the eyes, ears, and minds of the masses. Want to join the fight against antibiotic resistance? Or perhaps you want to further the research of penguins and their environment? You can even help astronomers find ripples in the very fabric of spacetime! These and even more fantastic projects are taking place right now, and they need YOU to become a citizen scientist to help out!

Check out some of the exciting projects you can help with below, or visit the main Zooniverse website to explore more ways YOU can become a community scientist!

Out-of-this-world astronomy!


Galaxy Zoo 

There are hundreds of billions of galaxies in our observable universe, waaaay too many for astronomers to classify on their own. This is where you come in! Analyze actual photos of distant galaxies that few humans have ever seen, and help us to better understand our universe in the process.

Planet Four

In this project, scientists can study pictures of Mars’ southern polar region to determine seasonal changes. Helpers will mark CO2 vents as fans or splotches to help understand how Mars’ seasonal pattern works.

Field Work


Notes from Nature 

This project allows you to explore the hand-written notes of historical botanists. Help modernize and digitize the important work that scientists from hundreds of years ago embarked on.

The University of Wyoming Raccoon Project

Look at pictures of raccoons trying to access food from a puzzle box! Using these pictures, citizen scientists will use special tools to identify what type of animal is onscreen to improve the project’s algorithm. The algorithm will help researchers study the behavioral patterns and traits of our favorite “trash pandas!”

Hummingbirds at Home

Using the Audubon Hummingbirds at Home app, you can create your very own “patch” to study hummingbirds and their activity. The patch can be your backyard, your porch, a local park, or any area you’d like! By studying hummingbirds and the nectar they collect, you can help scientists study the impact of global climate change!

iNaturalist

Have you ever seen a plant or animal and wondered what it was? There's an app for that! The iNaturalist app not only helps you identify new organisms, but hare your findings with scientific data repositories like the Global Biodiversity Information Facility to help scientists find and use your data. All you have to do is observe, point, and click! You can download the free app for Apple or Android devices.

Making Change


Power to the People 

Close to 1 billion people live without electricity worldwide but fixing this has proven to be an expensive and time-consuming endeavor. The only way to solve this problem is to train an AI to identify homes in rural areas but training such a complex algorithm requires the help of hundreds of people... people like you!

Anti-Slavery Manuscripts

Guests will review handwritten correspondence between 19th anti-slavery activists and turn them into text that can be more easily read by teachers, students, historians, and artificial intelligence programs.

We hope you enjoy these citizen scientist projects. Thank you for making a difference and furthering scientific research!

OSC At Home Emails

Get a round up of our latest activities and ideas delivered straight to your inbox so you don't miss a thing!

Find out when we release new resources by following us on social media!


Follow us on social media for even more science fun including fun facts, games, behind-the-scenes photos, and more!


Facebook Logo Instagram Logo YouTube Logo Twitter Logo

Support OSC At Home

In these ever-changing times, it is our pleasure to adapt quality Orlando Science Center experiences to engage with everyone while they are safe at home. Please consider supporting our operating fund to ensure we can continue developing resources today and well into the future. Thank you for your generosity and support!

Black History Monuments in Central Florida • Orlando Science Center Honors Red Tail Pilots

Signature Monument  Commemorates the First Black American Military Aviators 

Orlando may be known for its vast array of entertainment and attractions, but there is also rich, diverse, and unique culture. Throughout the years, the community has come together to create and preserve Black history monuments, museums, landmarks, and more, here in Central Florida. 

Since 2013, guests coming to Orlando Science Center from the Loch Haven Park entrance have been greeted by the Red Tails Monument, a 12-foot bronze spire leading up to four P-51 Mustang aircrafts in the “missing man” formation. The statue stands in honor of the bravery, passion, and sacrifice of the elite fighter group of Tuskegee Airmen known as the “Red Tail Angels,” nicknamed for the distinctive red paint on their aircraft propellers and tails.

The Tuskegee Airmen were the first Black military aviators in the United States armed forces. A total of 932 Black pilots trained at a segregated air base in Tuskegee, Alabama between 1941 and 1946. Of those, 356 were chosen to make up the elite 332nd Fighter Group, who would go on to be known as the Red Tails. They were sent to various European bases to fly escort for heavy bombers of the 15th Air Force during raids deep into enemy territory, earning an impressive combat record. Because they had one of the lowest loss records of any escort fighter group, bomber crews often requested to be escorted by the Red Tails. Of the 356 Red Tail pilots, 80 were killed, 32 were prisoners of war, and 17 were shot down, but evaded capture.

a photo of a dozen Red Tail pilots standing in front of a plane

Before the Tuskegee Airmen, no Black American had ever been a United States military pilot. During World War II, many U.S. states still upheld Jim Crow laws, a series of racist legislation that enforced the “separate but equal” treatment of Black Americans. These laws were used as justification for blocking previous attempts by Black American soldiers to become pilots. The Tuskegee Airmen were subjected to systemic racism, prejudice, and discrimination both within and outside the army. In spite of these adversities, they trained and flew with distinction while simultaneously fighting for their own civil rights. Even after proving their worth as world-class pilots, the Tuskegee Airmen still encountered segregation and were not permitted to fly alongside their white counterparts. The United States Armed Forces remained segregated until 1948.

The Red Tail Pilots of the Tuskegee Airmen played a crucial role in preparing the nation for racial integration in the military. Their heroic example continues to inspire future generations to reach to the skies and realize that all things are possible, even in the face of extreme adversity. 

The Tuskegee Red Tails monument is designed to inspire academic success in science, technology, engineering, and math fields, especially in aviation. With the understanding that diversity drives innovation, increasing the success of underrepresented and marginalized students in these fields is crucial in growing a STEM workforce that resembles the nation’s demographics at large.

The Tuskegee Red Tails statue stands in honor of the perseverance and success of the Tuskegee Airmen, and serves to recognize the vital contributions of Black Americans in United States history. The monument was funded by Syd Levy of United Trophy and dedicated by the City of Orlando, Orlando Science Center, and Vision of Flight, Inc.

The Red Tails Monument, a 12-foot bronze spire leading up to four P-51 Mustang aircrafts in the “missing man” formation.

Explore more Black history monuments around Central Florida

This is by no means an exhaustive list of important historical locations in and around Central Florida. From the Ocoee Massacre marker to the Mary McLeod Bethune Home in Daytona, the Mount Moriah Church in Port Orange and the Zora Neal Hurston Museum in Eatonville, explore more than 40 sites significant to Black history in Central Florida with this interactive map.

Hannibal Square

Officially founded in 1881, Hannibal Square originally consisted of African Americans who worked for the South Florida Railroad and Winter Park’s wealthy families. On Oct. 12, 1887, it became the site of one of the country’s earliest Civil Rights marches, when Gus Henderson led a group of Black residents across the town’s dividing railroad tracks to vote in the election that officially incorporated Winter Park, including Hannibal Square. What’s more, two Black residents were elected aldermen, serving from 1887 to 1893.

Hannibal Square in Winter Park

Tinker Field History Plaza 

The original field and buildings at Tinker Field were dedicated in 1923. Named for Joe Tinker, many Baseball Hall of Famers played here, including Jackie Robinson, Rod Carew, Bert Blyleven, Hank Aaron, Babe Ruth, Joe DiMaggio, and Harmon Killebrew.

Dr. Martin Luther King, Jr. gave his only speech in Central Florida, “Integration Now,” on the Tinker Field pitcher's mound less than a month before his death in 1964. 

a photo of Tinker Field baseball field and stadium

Wells’built Hotel

In 1926, Dr. Wells constructed a hotel that provided lodging to African Americans during segregation when hotel rooms were not available to them in other areas. Famous guests include Jackie Robinson, Ella Fitzgerald, Count Basie, and Justice Thurgood Marshall. The Wells’Built Museum of African American History is now located here, featuring memorabilia, artifacts, and a guest room with authentic furnishings of the 1930s. 


black history monument in central florida - Wells’Built Museum of African American History