Make a model that shows how water flows over different land shapes!
A topographic map shows different land features, like mountains, ravines, and plains, using curved lines or colors to show altitude. It’s an easy way to show a 3D view of something on a flat surface. Topo maps are commonly used by hikers, surveyors, government workers, and engineers, among other people.
Our model won’t be flat so it isn’t exactly like a topo map, but it will show the same type of information!
Ready to make your own? Follow the written steps below!
Materials you will need:
Half sheet of paper
Washable marker
Dropper bottle (your adult can also make one by using a thumb tack to poke a whole in a water bottle cap)
Tray or towel to catch any water spills
Directions:
Step 1: Crumple up a piece of paper and gently open it most of the way. It should still show ridges (high points) and valleys (low points.)
Step 2: Choose one of the ridges and color the whole ridgeline with a washable marker. Use lots of ink! (It’s easier if you use the flat side of the marker.)
Step 3: Place the paper on the towel or tray.
Step 4: Use the dropper to pour water onto the peak, simulating a rainstorm.
Step 5: Repeat this experiment with more ridges on your crumpled paper.
The colored water is following the path of the watershed!
The Science of Paper Mountains
Watersheds are parts of land, like mountains, that drain rain water and snow melt into rivers and lakes. This water can carry particles from the land into big bodies of water.
Marker ink moves with the water similarly to surface particles that are carried through a watershed.
Surface waste like trash on streets, exposed soil from landslides or construction, or pollution from mines or farms, is picked up by rainwater and carried to the closest body of water.
What happens upstream always influences the water quality and processes downstream.
Does your mountain have a dry side? A rain shadow is a dry area of a mountain that is caused by rain falling before the wind can carry it to the other side of the mountain.
Expand on This Activity:
Ask Your Scientist the Following Questions:
Which direction is the water flowing?
Does height make a difference?
Which parts of the paper stayed dry?
Keep Experimenting:
If you have one at home, try putting a Monopoly house or similar small object on different parts of the mountain. See how its location affects the house during heavy rain.
Test different heights for your mountain. When you keep the paper more crinkled you have higher peaks, does the water flow differently than if you flatten the paper more?
With so much going on at Orlando Science Center, it's hard to keep track of everything included in your OSC Membership! That's why our team is dedicated to getting our Members the latest exhibit news and goings on at the Science Center.
Science Center Members receive SCOPE Magazine three times per year in the Spring, Summer, and Fall to give them the full scope of what's in store that season. Members also get a granular, up-close view of the month ahead through our monthly Member e-newsletter, MicroSCOPE, get it?
A picture is worth LESS than a thousand words, and we can prove it!
Our brand-new OSC Flight Lab workshop, Painting with Pixels, will teach you how to get the most out of image generators that use Artificial Intelligence!
The Science of AI Generated Art
What is AI?
According to IBM, AI, or Artificial Intelligence, “leverages computers and machines to mimic the problem solving and decision-making capabilities of the human mind.”This definition provides a good understanding of the purpose of AI, but it doesn’t really provide a good perspective on just how ubiquitous AI has become in modern society. You likely use AI in one form or another every single day:
Nearly every aspect of your smartphones uses AI to give you the best possible user experience, from improvements to your photo quality and filters on your selfie camera, to autogenerated text-message responses.
Navigation systems like Google Maps and Apple maps use AI to optimize routes based on real-time traffic data.
Online shopping and video streaming platforms use AI to make recommendations based on your browsing and purchase history.
Even your modern smart-home appliances use AI to learn user behavior and make automatic adjustments.
And more!
As it turns out, every AI that has ever existed falls into only one category, called Narrow AI (aka Weak AI). Narrow AI systems are designed to excel at one particular task or set of tasks.
How does AI generate Art?
The AI starts with an image that is just pure noise – literal random pixels of random colors. When a prompt gets submitted to the program, it is first sent through an encoder – essentially a translator to make sure the input you give the AI is in a format it can understand. Then, using this translated prompt, it does something called diffusion, a process in which the pixels of the random noise are manipulated to create recognizable shapes over time.
There has never been an artist on Earth that has made good art without doing a lot of bad practice art first, and the same applies to AI. Every AI needs to go through training to be able to perform the task it’s built for! This concept is the basis of Machine Learning. We train AI that is designed to generate art by progressively feeding the AI noisier and noisier images of different types of objects with the goal of having the AI successfully denoise those images into something that is recognizable as the original image. The images that it successfully creates get fed back into the data it’s trained on, the images that it fails on get thrown out, and this process is repeated thousands of times until the AI is sufficiently trained.
You can make AI art of your own at home!
Things you’ll need:
A computer or smartphone with internet access
Adult supervision
Directions:
Step 1: Open an internet browser, navigate to the Bing Image Creator, and log in.
Step 2:Next, think about the image you want to create and come up with a prompt using the Perfect Prompt Formula found below.
Step 3:Type your prompt into the Bing Image Creator and submit.
Step 4:Wait while the image generates and enjoy!
The Perfect Prompt Formula:
Coming up with a creative prompt for your image generator can be hard, but using the following four ideas in your prompt can help you take advantage of the AI’s capabilities and make better art!
The best prompts on average have about 40 words and follow this structure:
“A __[Perspective]__ view of a _ [Description of Subject]__ in the style of __ [Stylization]__, background is __ [Description of Background]__, feelings of __ [Emotion]__.”
Thinking about perspective first will help youidentify what can and can't be in the scene, for example: using an extreme close-up view will likely obscurethe background, so that tells you to focus the other details you give the AI on the foreground. Of course, these are not the only perspectives you can use, but generally these extremes are what the AI works best with, as they are very distinct from one another. This also tends to be the most finicky of the things we can add to our prompt, so don’t expect perfect results.
Giving your images styles from different genres of media can really boost the wow-factor of your art, and you can do this by adding the keywords “in the style of” to your prompt. Furthermore, if you really like a particular artist’s style you can nearly exactly replicate that person’s style. This is a good time to mention that none of this stylization is possible without the artists that make real art by hand, and as a result there are certainly ways to use this technology irresponsibly, so be aware of what you’re choosing to use it for.
This is where you get to tell your story; What does your scene look like? What is happening? Paint a picture with words so the AI can do its thing.
Start with your subject. Anything you leave undescribed will be randomly generated, often resulting in the most basic or standard version of the subject in question, so it’s good to provide as much detail as you can when describing things.
The same applies to your negative space in the image; don’t leave anything unsaid! If you want your subject to be somewhere you wouldn't necessarily expect it, you can use the keywords “[your subject], background is...” to separately define parts of your scene in your prompt. Depending on your perspective you may give more detail to your foreground or background.
We always want our art to evoke some sort of emotion in the viewer. If you look at a piece of art and feel neutral, that is likely an ineffective piece of art. You can subtly inject colors, shapes, themes, and emotion into your art by putting the keywords "feelings of” in your prompt.Sticking to the standard emotions (i.e., sad, happy, angry) often leads makes the AI just giving everything faces, which may or may not be what you want, so feel free to get abstract with this.
Use a simple machine to turn potential energy into kinetic energy.
A simple machine is a device that allows people to do more work with less energy. It specifically applies to making things move and works by using physics to its advantage.
When an object is moving, it has kinetic energy. For example, as a ball rolls down a hill, its kinetic energy increases. Potential energy is energy that results from your position. If you start from the bottom of the mountain and climb up, the potential energy at the bottom of the mountain will be zero, while it will be a lot at the top of the mountain. As you climb the mountain, you gain potential energy.
A catapult combines these two concepts to launch heavy objects long distances. The catapult you’ll be making today is much smaller than a real one but works exactly the same way.
Ready to make your own? Follow the written steps below!
Materials you will need:
Popsicle sticks
Rubber bands
A bottle cap
Glue (hot glue works best)
Pompom balls
Directions:
Step 1: Glue the bottle cap onto one end of one of the popsicle sticks, leaving a bit of space above the cap. Let the glue dry.
Step 2: Stack 5 popsicle sticks on top of each other.
Step 3: Put the popsicle stick with the bottle cap on it perpendicularly – i.e., so it makes a cross – between first and second stick and another one between last and second to last. Leave ¾ of the stick on the other side of the stack.
Step 4: Tie rubber bands on both sides of the stack of sticks to hold it together.
Step 5: Tie the two perpendicular sticks together with a rubber band.
Step 6: Put the pompom ball into the bottle cap.
Step 7: Push down on the part of the stick behind the bottle cap and release. Watch the pompom ball fly!
The Science of Popsicle Stick Catapult
When you push the stick with the ball down, you are putting potential energy into the ball.
When you release the stick, the potential energy in the ball turns into kinetic energy.
The ball doesn’t go forever because it eventually loses kinetic energy due to the force of gravity.
Try this experiment at home and learn what causes a chemical reaction! A chemical reaction is when one or more substances react to form an entirely new substance with different properties.
There are 5 signs that a chemical reaction has occurred. These signs are easy to remember…just think about F.A.R.T.S. To identify whether a chemical reaction has occurred, at least one of these 5 changes:
Fizzes: Did the reaction produce bubbles or gas?
Aroma: Did the reaction produce a smell?
Re-color: Did the reaction produce a new color?
Temperature: Did the reaction produce a temperature change or release light?
New Substance: Did the reaction produce a new substance like water or a solid?
Ready to make your own? Follow the written steps below!
Materials you will need:
Vinegar
Baking soda
Any container (an empty plastic water bottle or small bowl works best)
A tray or something to catch the mess
Directions:
Step 1:
Pour some baking soda into the container (you don't need a lot)
Step 2:
Carefully pour some vinegar onto the baking soda and watch it fizz. You can pour more vinegar to make it erupt again until all the baking soda has dissolved.
Step 3:
Clean up, and if you want, try again.
The Science of Baking Soda and Vinegar
Mixing vinegar and baking soda causes an acid-base reaction that releases carbon dioxide.
The chemical equation looks like this: NaHCO3(s) + CH3COOH(l) → CO2(g) + H2O(l) + Na+(aq) + CH3COO–(aq)
This is an example of an acid-base neutralization reaction, where the reaction forms water and a salt as products.
Expand on This Activity:
Ask Your Scientist the Following Questions:
Which of the changes from F.A.R.T.S. did you notice in the reaction?
What else produces carbon dioxide (CO2)?
Keep Experimenting:
If you have food coloring, you can add a few drops to your baking soda before you pour the vinegar to get a colorful eruption.
You often see this reaction used to demonstrate a volcano erupting. Can you make a volcano out of things you have at home? You could use clay, papier mache, you can even make one outside out of dirt (just watch out for ants!)
The best deal in town just got better! Enjoy unlimited general admission, exclusive Member-Only events, discounts, and even more perks. Learn more.
Gift a Membership
Gift Memberships expire one year from the date of redemption. There is no time limit on redeeming the E-Gift Certificate. Learn more.
What's in a Membership?
UNLIMITED General Admission to Orlando Science Center exhibits including upcoming traveling exhibits and special events like Spark STEM Fest and Science Night Live.
Discounts on The Coffee Spot, The Science Store, 4Roots Cafe, special events like Kids Night at the Museum, Summer and Break Camp programs, Gift Memberships, and more!
Four complimentary Guest Passes valued at $96
FREE or discounted admission to 350 museums and science centers across the country through the Association of Science-Technology Centers (ASTC) Travel Passport Program.
As an OSC Member, you already know the amazing value of your annual membership, and this Cyber Monday, you can share it with your friends and family! Members always receive a 10% discount when you purchase a Gift Membership, but for ONE DAY ONLY you can take advantage of this sale and save 15% when you give someone else the gift of membership!
Add-ons for Family and Grandparent Membership levels are available to customize your membership, simply choose your membership level, and purchase your add-ons at your next visit.
Add the "Bring a Friend" feature for just $35 to bring one additional person with you each visit. For just $70, you can bring TWO additional people each visit as part of your Membership! Add-ons are available for purchase in person at OSC, or by calling 407.514.2158.
FREE Admission November 4-19, 2023 and Veterans Day Wreath Laying Ceremony
Science Center Joins Lockheed Martin in Saluting Former and Current Service Members
In honor of Veterans Day, veterans and active military can enjoy complimentary admission* to Orlando Science Center and 50% off for their family thanks to Lockheed Martin.
Admission includes access to two theaters, special live programming, and four floors of permanent and traveling exhibits such as Backyard Adventures, the newly updated Our Planet, Our Solar System, and so much more for learners of all ages and interests! Explore the calendar to see what's going on at Orlando Science Center during your visit.
Veterans and active military also receive 10% off Memberships all year long!
*Admission and Membership discounts are only available in person at the Science Center. Must present valid military ID and matching photo ID to redeem.
We invite you to join us in honoring our veterans during a brief ceremony on Saturday, November 11 at the Red Tails Monument in Loch Haven Park located just outside of the Science Center.
The wreath ceremony is made possible by Lockheed Martin to honor veterans and salute the brave people who keep our nation safe. The Red Tails Monument is made possible through a partnership with Orlando Science Center and Vision of Flight.
General Admission to Orlando Science Center is not required to attend the outdoor ceremony.
The Red Tails Monument serves as a symbol of courage and triumph over adversity that inspires future generations in their pursuit of academic success and careers in STEM fields, such as aviation. During World War II, the Red Tail Pilots of the Tuskegee Airmen were subjected to racial discrimination, both within and outside the Army. Despite these adversities, they trained and flew with distinction.
This promotion and ceremony are made possible by Lockheed Martin to honor veterans and salute the brave men and women who keep our nation safe. As our military serves our country proudly, their families serve, too. Lockheed Martin works with nonprofit partners like Orlando Science Center to support the active-duty force and their families. In addition, more than 20,000 veterans work at Lockheed Martin. To learn more about Lockheed Martin’s commitment to veterans, please visit their website.
BOO! It's Spooky Season, and we're celebrating with DIY mummy sock puppets!
Mummies aren't just a great costume for Halloween night. Mummification was a 70-day process of preserving the bodies of pharaohs, members of nobility, and even animals. This process has allowed us to know what these great individuals looked like 3,000 years ago and to understand the preservation of human bodies.
Research shows that Egyptians began the processes of mummification around 2600 BCE. This practice endured for well over 2,000 years, continuing into the Roman Period. However, the quality of mummification someone received was dependent upon the price paid. Pharaohs such as Tutankhamen and others were prepared with the utmost attention to detail, laid to rest with treasured items.
Learn to make your own Mummy Sock Puppet!
Want to try your hand at making your own mummy sock puppet? This is a fun and easy activity you can do right at home!
Materials
Sock
Fabric Markers
Buttons
Yarn
Thread
Sewing Needles
Step 1:
Gather materials.
Step 2:
Use the fabric marker to mark where you want to sew the button eyes.
Step 3:
Thread the needle and sew on both buttons.
Step 4:
Either sew on yarn accessories or wrap your sock puppet in yarn to mimic a mummy's wrappings. Make sure you don't wrap too tight so you can remove your hand from the sock puppet!
Step 5:
Tie off thread/yarn loose ends and enjoy your sock puppet!
Expand on the Activity
Did you love making your spooky sock puppet? Check out these other fun and easy experiments you can do right at home to help you get into the spirit of the season!
Simple Spooky STEM Activities to Scare Up Some Fun
Halloween is one of our favorite holidays at the Orlando Science Center, so we’ve rounded up some of our favorite simple spooky STEM activities that you can do at home!
How to Demonstrate Static Electricity and Shock Your Friends
Learn a phantom-tastic physics lesson while you learn how to demonstrate static electricity! Put a little boogie in tissue paper ghosts to make them dance in this fun and simple science activity.
What to do with Leftover Candy? Learn Some Sweet Science!
This experiment is sugar, and spice, and everything science! Join us as we dive into some chemistry (and our candy stash) and we'll give you a fun trick for what to do with your leftover treats.
What pigments are in different types of black markers?
Try this Chromatography experiment and watch as ink breaks down into different colors!
Chromatography is a really useful technique for chemists, helpful in everything from identifying biological materials to finding clues at crime scenes.Chromatography separates the parts of a mixture based on whether they like to stick to the paper, or if they like to travel with the liquid.
Ready to try it out? Follow the written steps below!
Materials you will need:
Black Sharpie marker
Black Crayola marker
Black Expo marker
Isopropyl (rubbing) alcohol
Shallow bowl (this will get marker on it)
Directions:
Step 1: Rip your coffee filter into three pieces.
Step 2: At the top of each piece label them. S for Sharpie, E for Expo, and C for Crayola.
Step 3:Use the marker that matches the letter to make a thick dark mark at the bottom of each piece.
Step 4:Pour a little bit of alcohol into the bottom of the bowl.
Step 5:Place the tips of each of the three filter pieces in the bowl so that they are touching the alcohol. It will take a little time, but you should start to see the ink move up the filters.
The Science of Chromatography
Alcohol acts as a solvent and dissolves the chemicals that make color in markers. The chemicals that dissolve best will move further up the filter.
Sharpies are alcohol based, Crayola washable markers are water based, and Expo markers are alcohol based if they’re dry erase and water based if they’re wet erase.
The alcohol based markers will dissolve better in the rubbing alcohol because it is the main ingredient in the ink.
Expand on the Activity
Did you enjoy this Chromatography experiment? Expand on the activity with the options below.
Ask Your Scientist the Following Questions:
Did the inks travel at the same speed?
Did they all travel the same distance?
What other ways could chromatography be useful?
Keep Experimenting:
Try it with other types of black ink, like a writing or drawing pen. Would it work with printer ink?
Does the color of the ink matter? See our OSC @ Home blog about capillary action to explore a colorful version of this experiment.
Try using water instead of alcohol and see if it works.
Can you hear me now? Learn how to make a DIY Cup Phone!
How do phones allow us to talk to people who are so far away? We can find out by making a DIY cup phone using things you might have around the house.
Telephones turn sound waves into electricity that can be sent using cables. Once the sound electricity reaches you, magnets are used to convert the electrical signals back into sound waves. The sound vibrates the air around it, so you can hear what the person on the other end of the line is saying.
Ready to make your own? Follow the written steps below!
Materials you will need:
2 Styrofoam or paper cups
Twine or other string
Scissors
Markers (these are optional!)
Directions
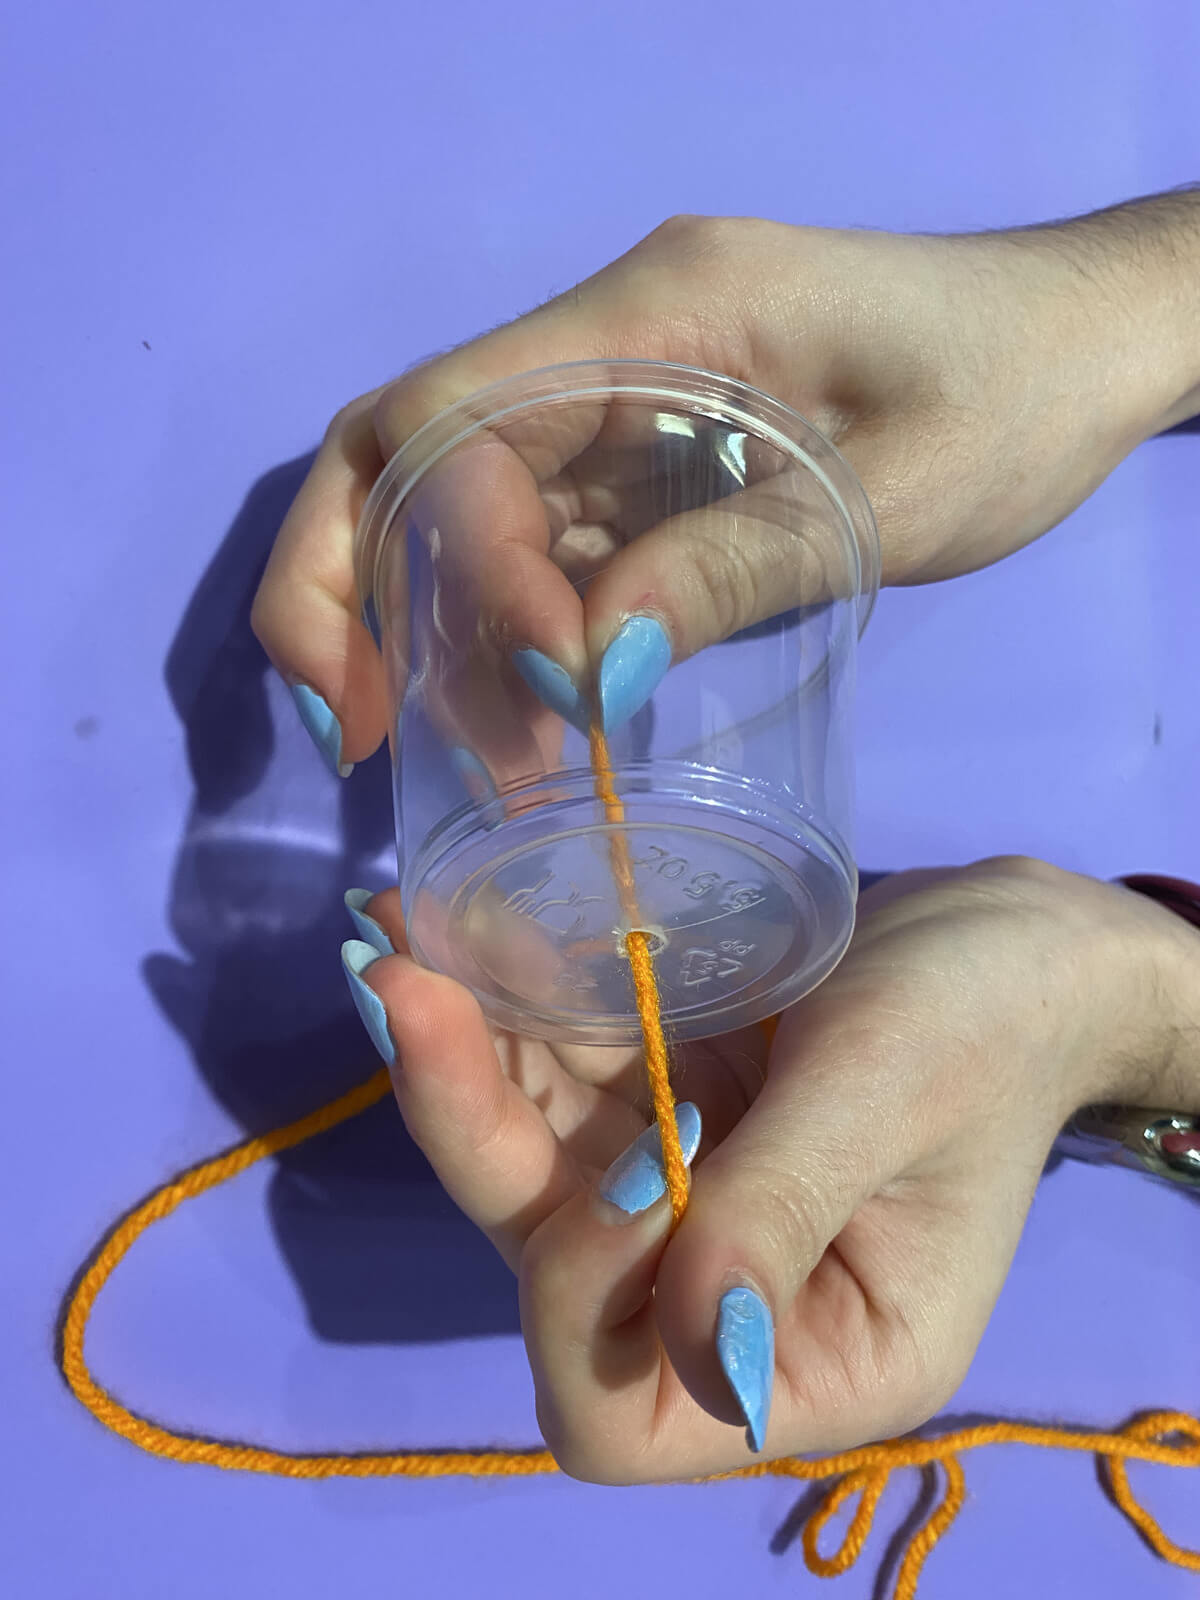
Step 1: Use the scissors to poke a hole in the bottom of each cup.
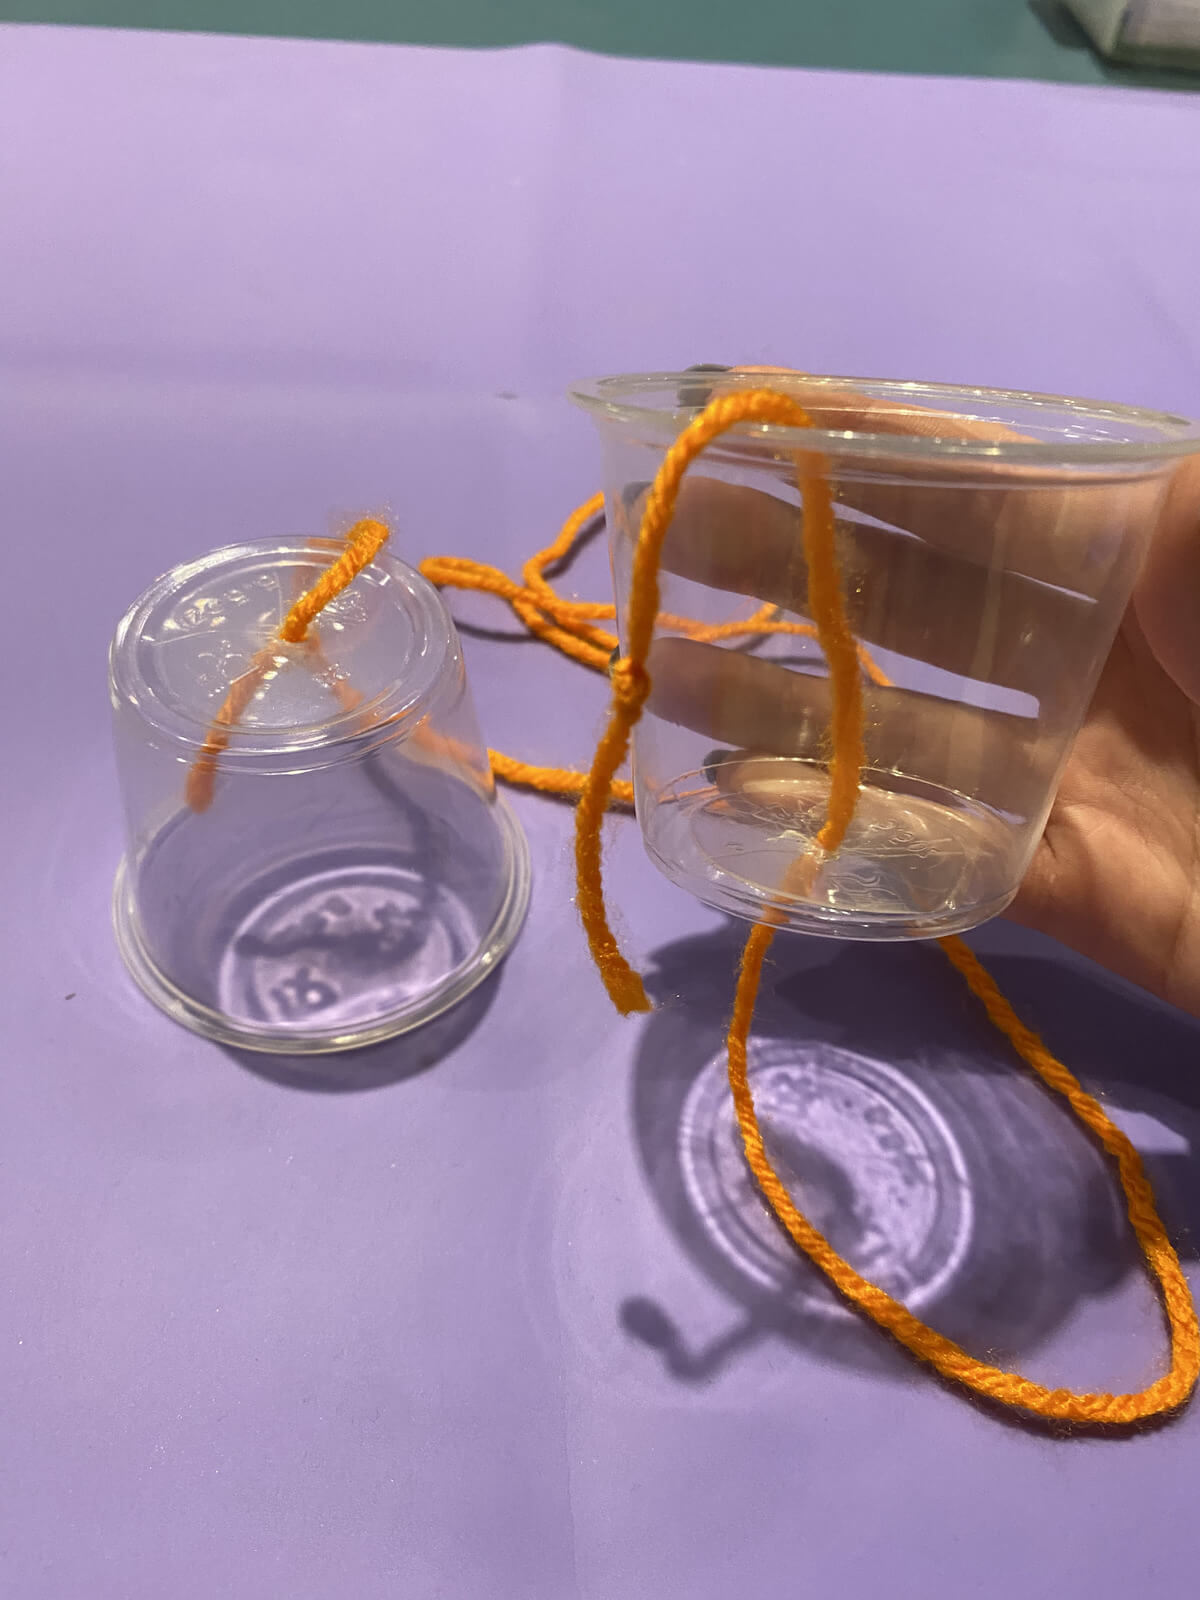
Step 2: String a piece of twine between the cups by pushing each end of the string inside the holes you just made. Use a long piece of string to help the sound travel farther.
Step 3: Tie a knot in the end of the string inside the cups to keep the cups from falling off.
Step 4: Feel free to decorate your cups with markers if you want, but there's nothing wrong with keeping them plain!
Step 5: To use the phone, all you have to do is talk into the cup while someone else holds the other cup to their ear. Make sure to keep the string tight; if the string is sagging, the sound won't travel effectively!
The Science of Cup & String Phones
You may have heard that sound travels - but how?
Sound is made up of waves that we can hear. These sound waves are formed by objects vibrating, or shaking back and forth very quickly.
Sound travels through air, water, and solid objects as vibration.
The sound of your voice vibrates the cup, which cases the string to vibrate, too, as sound travels down it.
Our ears collect the sound vibration, where nerves send them to our brain.
Our brains process the signals, and then we hear the sound!


")
")


")
")
")