What pigments are in different types of black markers?
Try this Chromatography experiment and watch as ink breaks down into different colors!
Chromatography is a really useful technique for chemists, helpful in everything from identifying biological materials to finding clues at crime scenes.Chromatography separates the parts of a mixture based on whether they like to stick to the paper, or if they like to travel with the liquid.
Ready to try it out? Follow the written steps below!
Materials you will need:
Black Sharpie marker
Black Crayola marker
Black Expo marker
Isopropyl (rubbing) alcohol
Shallow bowl (this will get marker on it)
Directions:
Step 1: Rip your coffee filter into three pieces.
Step 2: At the top of each piece label them. S for Sharpie, E for Expo, and C for Crayola.
Step 3:Use the marker that matches the letter to make a thick dark mark at the bottom of each piece.
Step 4:Pour a little bit of alcohol into the bottom of the bowl.
Step 5:Place the tips of each of the three filter pieces in the bowl so that they are touching the alcohol. It will take a little time, but you should start to see the ink move up the filters.
The Science of Chromatography
Alcohol acts as a solvent and dissolves the chemicals that make color in markers. The chemicals that dissolve best will move further up the filter.
Sharpies are alcohol based, Crayola washable markers are water based, and Expo markers are alcohol based if they’re dry erase and water based if they’re wet erase.
The alcohol based markers will dissolve better in the rubbing alcohol because it is the main ingredient in the ink.
Expand on the Activity
Did you enjoy this Chromatography experiment? Expand on the activity with the options below.
Ask Your Scientist the Following Questions:
Did the inks travel at the same speed?
Did they all travel the same distance?
What other ways could chromatography be useful?
Keep Experimenting:
Try it with other types of black ink, like a writing or drawing pen. Would it work with printer ink?
Does the color of the ink matter? See our OSC @ Home blog about capillary action to explore a colorful version of this experiment.
Try using water instead of alcohol and see if it works.
Can you hear me now? Learn how to make a DIY Cup Phone!
How do phones allow us to talk to people who are so far away? We can find out by making a DIY cup phone using things you might have around the house.
Telephones turn sound waves into electricity that can be sent using cables. Once the sound electricity reaches you, magnets are used to convert the electrical signals back into sound waves. The sound vibrates the air around it, so you can hear what the person on the other end of the line is saying.
Ready to make your own? Follow the written steps below!
Materials you will need:
2 Styrofoam or paper cups
Twine or other string
Scissors
Markers (these are optional!)
Directions
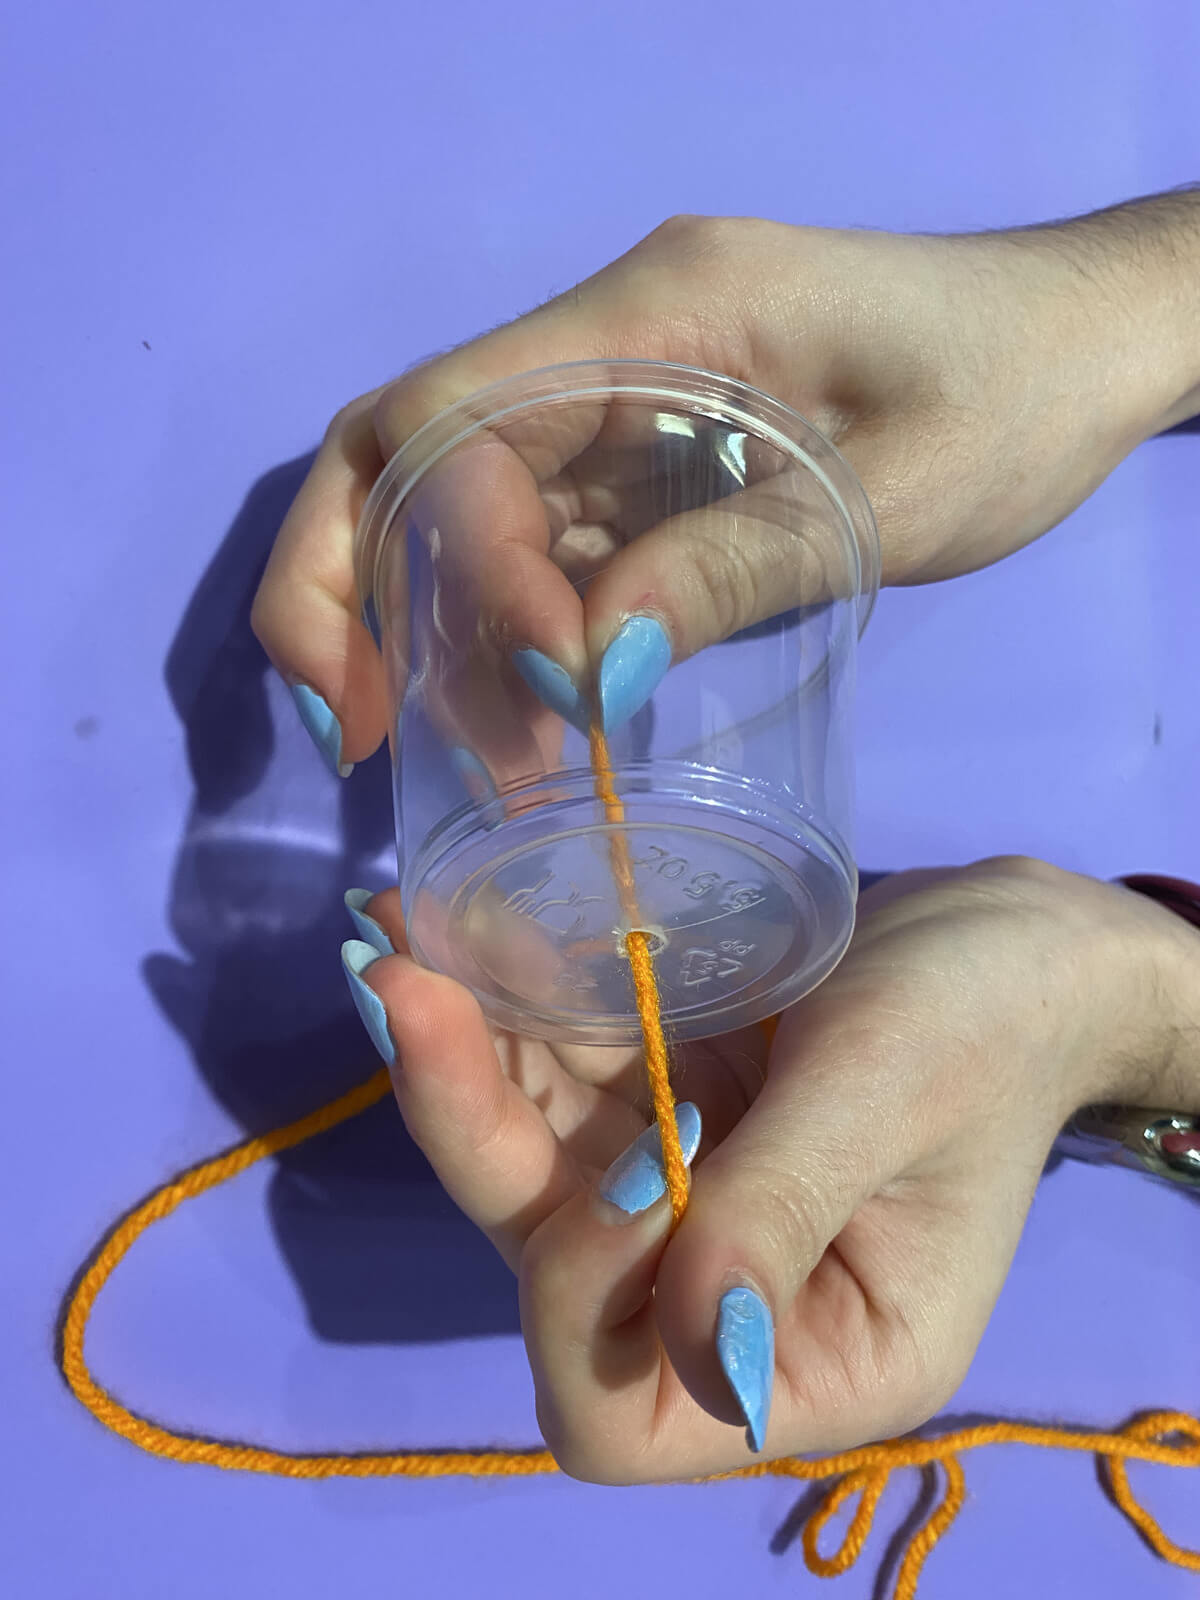
Step 1: Use the scissors to poke a hole in the bottom of each cup.
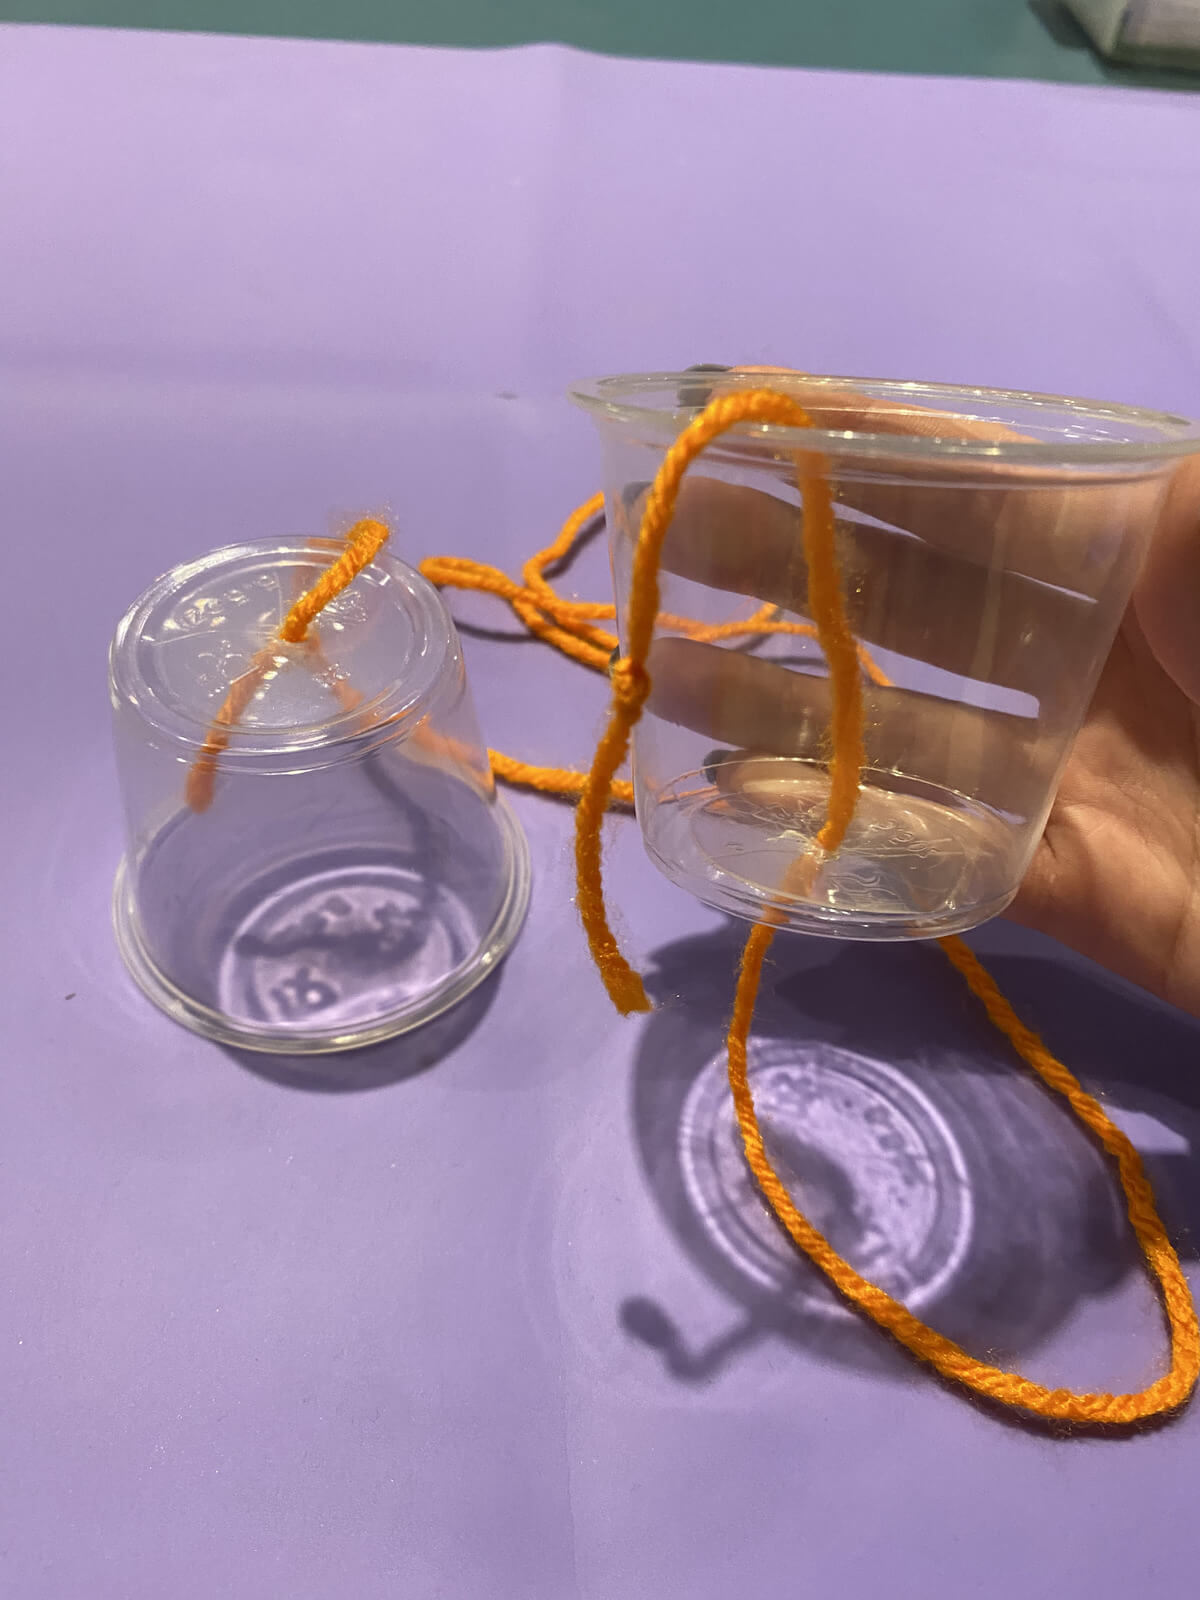
Step 2: String a piece of twine between the cups by pushing each end of the string inside the holes you just made. Use a long piece of string to help the sound travel farther.
Step 3: Tie a knot in the end of the string inside the cups to keep the cups from falling off.
Step 4: Feel free to decorate your cups with markers if you want, but there's nothing wrong with keeping them plain!
Step 5: To use the phone, all you have to do is talk into the cup while someone else holds the other cup to their ear. Make sure to keep the string tight; if the string is sagging, the sound won't travel effectively!
The Science of Cup & String Phones
You may have heard that sound travels - but how?
Sound is made up of waves that we can hear. These sound waves are formed by objects vibrating, or shaking back and forth very quickly.
Sound travels through air, water, and solid objects as vibration.
The sound of your voice vibrates the cup, which cases the string to vibrate, too, as sound travels down it.
Our ears collect the sound vibration, where nerves send them to our brain.
Our brains process the signals, and then we hear the sound!
Build curiosity with a hands-on civil engineering experiment for kids
A civil engineer uses math, physics, and design to create large structures like buildings, roads, and bridges.Some shapes hold up better against different types of pressure than others. For example, some stand very well against wind, while others hold up against the side-to-side shaking of an earthquake.
In this civil engineering experiment, kids of all ages can put on their thinking caps and hard hats and see if they can design a structure to withstand the forces of nature.
Can YOU figure out which shape works best for which situation?
Materials:
Dominoes
Tray or other platform to build on
Desk fan
Weights or something small and heavy
Step 1:
Build 3 shapes: Start by constructing 3 of the most common architectural shapes, an arch, a pyramid, and a cube.
The arch should include an opening in a structure that is curved on top and designed to distribute weight.
In architecture, a pyramid is a monumental structure having a rectangular base and four sloping triangular (or sometimes trapezoidal) sides meeting at an apex or truncated to form a platform.
Your cube is a solid three-dimensional figure, which has 6 square faces, 8 vertices and 12 edges.
Step 2:
Test your shapes!
Now we’ll test each structure against different conditions!
Test each structure – the arch, the pyramid, and the cube – by placing a weight on top of it. Do they all hold up under the weight?
Remove the weights from the structures. Test each structure by using the fan to force wind against the sides of them. Do they stand up against the wind?
Make sure all three structures are on the tray. Using your hands, gently shake the tray side-to-side on the table. Do the structures stay together and pass the test?
Step 3:
Analyze the results and create some more or stronger shapes!
Let's take a look at the science behind these shapes and the forces behind them.
Gravity is the force that pulls things towards the center of the Earth. In doing so, it holds us down on the ground.Certain areas around the world get a lot of wind. Wind exerts a lateral force on the sides of buildings, pushing against them.One of the hardest places to build cities is in areas with earthquakes. Earthquakes cause the buildings to move side-to-side.
Now that you've gone through your first round of testing, here are some fun questions to ask your kids about their civil engineering experiments:
Which shape worked best against each natural condition?
Where in the world would you find these structures?
Where would you build these structures?
As you head back to the drawing board, what have you learned, and what can you improve?
Does the size of the structure matter? If you have enough dominoes, try scaling them up by making each one 2 or 3 times bigger.
How about the intensity of the conditions? Try putting more weights, increasing wind speed, and shaking the tray more.
These winter sensory STEM experiments are perfect if the cold never bothered you anyway!
From ice cream to ice chalk, celebrate the winter solstice with some (literally) cool sensory STEM experiments. Join us as we explore the chemistry behind some ice-citing concoctions, learn a trick to make your friends think you can freeze time, and more!
A frozen twist on a classic favorite, ice chalk is a fun way to take your sidewalk art game to the next level!
Sidewalk chalk is cool but ice chalk is even cooler, literally! Start in the kitchen concocting your chalk paint-sicles, then, when they're ready, head outside and get to painting your pavement!
I scream, you scream, we all scream "SCIENCE" with this ice cream science project!
Feel the chill this winter as you learn the science of cold by making homemade ice cream! This vanilla or chocolate ice cream science project doesn’t require any fancy equipment, just plastic food storage bags, elbow grease, and chemistry!
What if we told you that you could freeze time with just a balloon, tape, and some water?
We promise this isn’t CGI magic or a trick of the camera. What you are seeing is aparticularly interesting fluid dynamic, which is a scientific way of saying the flow of a fluid (which is any liquid or gas), called laminar flow.
Follow along with the video, or get the written steps below!
If it doesn't feel like winter, it can still sound like winter
When you think of winter, you probably think of cold temperatures, icicles, and snow. But many places around the world enjoy a tropical December - February. If you can't walk in a winter wonderland, you can at least make it sound like you are with this Foley art activity!
Get into the Halloween spirit with these simple spooky STEM activities!
Halloween is one of our favorite holidays at the Orlando Science Center, so we’ve rounded up some of our favorite simple spooky STEM activities that you can do at home!
We’ve also included instructions on how to give some activities a special Halloween twist. From making the slimiest slime to exploring art with candy, find them all in one place below.
STEM Slime Time!
Our staff concocted the slimiest slime recipe for you to try at home! For glowing slime, use tonic water or highlighter water instead of regular water. Click here to make highlighter water!
Make an ooey-gooey mess with just two ingredients! Learn about the states of matter and viscosity, practice lab skills like measuring and mixing with this educational messy science experiment that's so fun, you won't even realize you're learning!
To make pumpkin oobleck, color the oobleck orange with paint or food coloring and add pumpkin-scented oil. Alternatively, you can mix a can of pumpkin puree in a pitcher of water and use it in place of the regular water.
Have you ever wanted to make something glow under a blacklight? Let us teach you one of our favorite hacks, which you can turn into an Ectoplasm Detector!
Write or draw messages, then hide them in a dark place. Make the Ectoplasm Detector by following the instructions for your DIY Blacklight Hack then use your ectoplasm detector to find and reveal the ghostly messages!
Trick or Treat! In this experiment, science is sweet! Use a little bit of candy to make Halloween pictures that swirl like magic, to explore chemistry, and to practice making predictions and observations.
Get a round up of our latest activities and ideas delivered straight to your inbox so you don't miss a thing!
Find out when we release new resources by following us on social media!
Follow us on social media for even more science fun including fun facts, games, behind-the-scenes photos, and more!
Support OSC At Home
In these ever-changing times, it is our pleasure to adapt quality Orlando Science Center experiences to engage with everyone while they are safe at home. Please consider supporting our operating fund to ensure we can continue developing resources today and well into the future. Thank you for your generosity and support!
Learn about the science of suds with these sensory soap experiments!
Double, double, science, and bubbles!
Bubbles are everywhere! We see them in soap, soda, and even our own saliva (gross!)Have you ever wondered why and how scientists study bubbles? Try it out for yourself with these five sensory soap experiments that will teach you all about the science of suds and bubbles.
Water you waiting for? Let's get started!
Bubble Snakes
Make bubble snakes with this sensory, early childhood approved activity! With just a few items, you can make long, endless bubbles. To make this more fun, add some washable paint to your bubble solution!
Lava lamps are making a comeback with this DIY project! With some simple items found around the house, your young scientist will learn all about density with these simple steps.
If you’ve ever wondered why bubbles pop, you’re not alone. Other than being poked or landing on something sharp, bubbles pop when the water between the soap film surfaces evaporates.
Want to make your own un-poppable bubbles? All you need is water, dish soap, and glycerin.
Iridescence is a rainbow-like coloration that changes colors when you look at it from different angles. It can be found naturally in animals like fish scales or a butterfly's wing. It can also be seen in bubbles!
Using just drops of clear nail polish, you can achieve this effect at home and create a customized iridescent bookmark!
We'd like to thank our partner, Florida Prepaid, for sponsoring this colorful activity! Today’s young scientists are tomorrow’s college graduates. Saving early for college sends your child a powerful message that you believe in their future — and want them to avoid debt later. Learn more about Florida Prepaid’s College Savings Plan at myfloridaprepaid.com.
What if we told you that you could freeze time with just a balloon, tape, and some water? Now what if we showed you how to demonstrate laminar flow at home?
We promise this isn’t CGI magic or a trick of the camera. What you are seeing is aparticularly interesting fluid dynamic, which is a scientific way of saying the flow of a fluid (which is any liquid or gas), called laminar flow.
Below we are going to explore the following questions: What is laminar flow? What is laminar flow used for in everyday life? And most importantly, how can you demonstrate laminar flow at home?
What is Laminar Flow?
Laminar flow is a type of flow pattern of a fluid in which all the particles are flowing in parallel lines, opposed to turbulent flow, where the particles flow in random and chaotic directions. A flow is either turbulent, laminar, or somewhere in between. This is measured by the Reynolds number which is a ratio between velocity (the speed of the flow) and viscosity(how thick or thin the fluid is). The more viscous, or thick, the fluid is the faster it can flow without going turbulent.
What is Laminar Flow Used For?
Laminar flow has a wide range of real-life applications. A type of laminar flow is achieved everyday by pilots. A smooth flight occurs when the flow of the air over an aircraft’s wings is laminar. If the pilot runs into a very turbulent patch of air the wing cannot correct the air to make it laminar, causing turbulence.
A different example of laminar flow occurs everyday inside of you.Blood flowing throughout your body is flowing laminarly.
One last example of laminar flow is syrup, or honey, flowing out the nozzle. Because the liquid is so thick, or viscous, the Reynolds number indicates that the flow is very laminar.
How Can I Demonstrate Laminar Flow at Home?
The following video and steps below it are detailed for you to try and recreate laminar flow at home.
Adult supervision is required as this experiment involves the usage of sharp and potentially dangerous objects.
Step 1: Gather the following materials:
One balloon
Duct Tape or electrical tape
Water
A sharp object (to pierce the balloon)
Step 2: Fill the balloon with water and tie it off.
Step 3: Make a square on your balloon out of tape. Make sure you pat down the tape, so it’s smoothly secured. Different sized squares result in different sized flows.
Step 4: With adult assistance pierce the balloon inside the square with your sharp object and watch as the water flows out laminarly!
How did it go? Try taking your own spin on the experiment, does the amount of water change the results? How about where you place the square? Do you think you can get multiple flows to happenon the same balloon?
If you tried to demonstrate laminar flow at home, be sure you submit you photos and videos of your experiments to our Science Showcase here or tag Orlando Science Center on social media and use hashtag #OSCatHome for a chance to be featured on our channels!
Until next time,STAY CURIOUS!
OSC At Home Emails
Get a round up of our latest activities and ideas delivered straight to your inbox so you don't miss a thing!
Find out when we release new resources by following us on social media!
Follow us on social media for even more science fun including fun facts, games, behind-the-scenes photos, and more!
Support OSC At Home
In these ever-changing times, it is our pleasure to adapt quality Orlando Science Center experiences to engage with everyone while they are safe at home. Please consider supporting our operating fund to ensure we can continue developing resources today and well into the future. Thank you for your generosity and support!
We'd like to thank our partner, Florida Prepaid, for sponsoring this colorful activity! Today’s young scientists are tomorrow’s college graduates. Saving early for college sends your child a powerful message that you believe in their future — and want them to avoid debt later. Learn more about Florida Prepaid’s College Savings Plan at myfloridaprepaid.com.
Learn about molecules and more with this easy tie-dye milk experiment
Make a rainbow of colors swirl around with materials you can find in your kitchen and a dash of science!
Atoms and molecules are the particles that make up everything. What element or elements they are, how they’re arranged, how they move, and how they interact with each other determines how a substance looks, acts, and reacts. However, atoms and molecules are very, very small. You could line up 70 million helium atoms in a row across a pencil eraser!
This makes them way too small to see with our own eyes or even with many microscopes. But we can observe molecules in motion with this tie-dye milk experiment.
Ready to make your own? Watch along or follow the written steps below!
Materials you will need:
Milk or cream
Food coloring
Cotton swabs or toothpicks
Dish soap
A dish or plate with a rim that can hold liquid.
Directions:
Step 1: First, add some milk or cream to your dish. You want to make sure the milk completely covers the bottom of the dish, but you don’t need to completely fill it.
Step 2: Next, add 4 drops of food coloring to the center of the dish, being careful not to let them mix. Don’t stir the milk and food coloring! You want them to stay separate for now.
Step 3: Pick up your cotton swab or toothpick. Carefully cover one end of it with dish soap.
Step 4: When you’re ready, touch the center of the milk with the soapy end of your swab and watch the colors move!
The Science of Tie-Dye Milk
Milk is a mixture. It’s mostly water, but it also has proteins, fats, and other molecules mixed in.
Because milk is mostly made up of water, it acts a lot like water and has many of the same properties.
One of these properties is called surface tension. Surface tension is how resistant a liquid is to external force, or how strong the surface of the liquid is. It’s a bit like the surface of water having a sort of “skin.” This is how some insects can walk on water.
Soap is what we call a surfactant. It lowers the surface tension of a liquid.
When we dip the soap in the milk, it lowers its surface tension and causes not just the water molecules, but fat and protein molecules, to move as they quickly rearrange themselves.
By adding food coloring, we can see the movement caused by lowering the surface tension.
Expand on This Activity:
Ask Your Scientist the Following Questions:
What new colors do you see?
How are the colors moving?
Why do you think this happened?
Keep Experimenting:
Press down on the bottom of the dish with the soap-covered cotton swab for three seconds, then lift up. How is the movement of the colors different than when you quickly touch the cotton swab to the milk’s surface?
Touch the cotton swab to areas where the colors have collected to watch the colors continue to move.
Try the experiment with more or fewer colors of food coloring. How is the tie-dye different?
The Science of Tie-Dye Milk
Milk is a mixture. It’s mostly water, but it also has proteins, fats, and other molecules mixed in.
Because milk is mostly made up of water, it acts a lot like water and has many of the same properties.
One of these properties is called surface tension. Surface tension is how resistant a liquid is to external force, or how strong the surface of the liquid is. It’s a bit like the surface of water having a sort of “skin.” This is how some insects can walk on water.
Soap is what we call a surfactant. It lowers the surface tension of a liquid.
When we dip the soap in the milk, it lowers its surface tension and causes not just the water molecules, but fat and protein molecules, to move as they quickly rearrange themselves.
By adding food coloring, we can see the movement caused by lowering the surface tension.
Learn More: Chemistry
Many atoms and molecules have positive (+) or negative (-) charges. An atom or molecule with no charge is called neutral. Positive and negatively charged atoms attract, just like the north and south poles of a magnet.
Molecules can be polar or nonpolar. Polar molecules have one side that is much more positive or negative than the other. Nonpolar molecules don’t have a difference in charge. Polar molecule likes to mix with other polar molecules, and nonpolar molecules like mix with other nonpolar molecules. Polar and nonpolar molecules don’t mix. This is what keeps oil and water separate; oil is made of nonpolar molecules and water is made of polar molecules!
Water molecules have a positive side and negative side. This makes water a polar molecule. Because of this, water molecules can stick to each other. Molecules in liquid sticking to each other is known as cohesion. The cohesion between the water molecules at the surface is what creates surface tension.
Soap molecules have a negative side and neutral side, so it has both a polar and nonpolar end. The negative side of the soap molecule is attracted to the positive side of the water molecule, weakening the attraction between the water molecules and lowering the surface tension.
But that’s not all. The neutral sides of the soap molecules also interact with the nonpolar fat molecules, separating them out of the milk. This is how soap is able to clean up greasy messes!
OSC At Home Emails
Get a round up of our latest activities and ideas delivered straight to your inbox so you don't miss a thing!
Find out when we release new resources by following us on social media!
Follow us on social media for even more science fun including fun facts, games, behind-the-scenes photos, and more!
Support OSC At Home
In these ever-changing times, it is our pleasure to adapt quality Orlando Science Center experiences to engage with everyone while they are safe at home. Please consider supporting our operating fund to ensure we can continue developing resources today and well into the future. Thank you for your generosity and support!
Are you wondering what to do with leftover candy? You're in for a treat!
This experiment is sugar, and spice, and everything science! Join us as we dive into some chemistry (and our candy stash) and we'll give you a fun trick for what to do with your leftover treats.
We'll use a little bit of candy to make pictures that swirl like magic, to explore chemistry, and to practice making predictions and observations.
Materials you will need:
Candy with a hard shell, like Skittles or M&M’s
Warm water
Shallow dish or plate that can hold liquid
Directions:
Step 1:
Arrange your candy in a design on your dish.
You can try arranging them in a circle around the edge of the dish, or making pictures with them. Since we're using Halloween candy, we made a pumpkin.
Step 2:
Slowly pour your warm water over the candy.
Encourage your scientist to answer these questions:
Before you add water, ask your scientist what they think will happen and why. This is called a hypothesis.
What happens to the letter on the candy?
Why do think the colors are moving?
Why do you think the colors aren’t mixing?
How do you think you could speed up the reaction
Step 3:
Watch what happens! What do you observe?
Make it sweeter!
Make different designs. How are the color patterns different based on the design you make?
Add another piece of candy after you’ve added water and the colors have started to spread out. What happens?
Add a sugar cube to the candy after you’ve added the water and the colors have started to spread out. What happens?
Experiment with different water temperatures. What temperature works best?
Try using different candies. Which ones do you think will cause colors to spread out across the water
Expand on the Activity!
The Science
The colored shells on Skittles and M&M’s are made out of sugar and food coloring. As the sugar and food coloring dissolve in water, they diffuse (or spread out) across it. This changes the clear water to the colors of the candy.
The colors move from the area with the highest concentration of color (the candy and the area right next to it) to the area with lowest concentration (the area farthest away from the candy). Watch how the color moves away from the candies. Molecules moving from an area of higher concentration to an area of lower concentration is called a concentration gradient.
The colors don’t mix because of something called water stratification. Each color of food coloring has a slightly different chemical make-up. Because of this, they have slightly different densities. This keeps the colors from mixing as they spread out.
Get a round up of our latest activities and ideas delivered straight to your inbox so you don't miss a thing!
Find out when we release new resources by following us on social media!
Follow us on social media for even more science fun including fun facts, games, behind-the-scenes photos, and more!
Support OSC At Home
In these ever-changing times, it is our pleasure to adapt quality Orlando Science Center experiences to engage with everyone while they are safe at home. Please consider supporting our operating fund to ensure we can continue developing resources today and well into the future. Thank you for your generosity and support!


")


")